Peel Consultation and Initial Treatment
Initial Consultation
The consultation is a vital part of achieving success with your patients. The initial consultation sets the tone for your relationship with your patients and is the key to your success. Trust between you and your patient builds loyalty as well as compliance. Educating your patients about their skin works to further solidify that relationship.
We recommend charging for your consultation and building the cost of a trial solution into your fee. During the consultation you can provide these trial products to the patient at no charge, and go through each product and direction for their use using your Rx Treatment Plan. Consider washing their face and applying their recommended products. This teaches application technique and demonstrates the immediate benefits of using quality skincare products. A condition-specific, trial-size solution of PCA SKIN® products allows the patient to try products prior to their first peel. This is highly recommended 10 to 14 days prior to an in-office superficial chemical peel to prepare the skin. This is a suggestion, not a requirement, but it will increase results and minimize reactions. Use of the trial solutions prior to their first treatment also minimizes product returns and increases full-size retail product purchases at the initial treatment appointment.
The initial consultation should typically be limited to 45 minutes. A Patient Profile should be completed thoroughly by the patient prior to consultation.
New Patient Procedure
Skin analysis
- Review the Patient Profile with the patient, noting any unusual problems, allergic conditions, use of medications, or contributing stress factors.
- Ask the patient to describe their skin and have them specify areas of concern.
- Assess the patient using the Fitzpatrick scale and Global Heritage Model.
- Cleanse the skin thoroughly with Facial Wash Oily/Problem.
- Tone with Smoothing Toner. This product will sting or tingle mildly on most individuals. Ask, “On a scale of one to ten, ten being extremely active, how do you rate this sensation?” Make note of their response, as this is an indication of patient sensitivity.
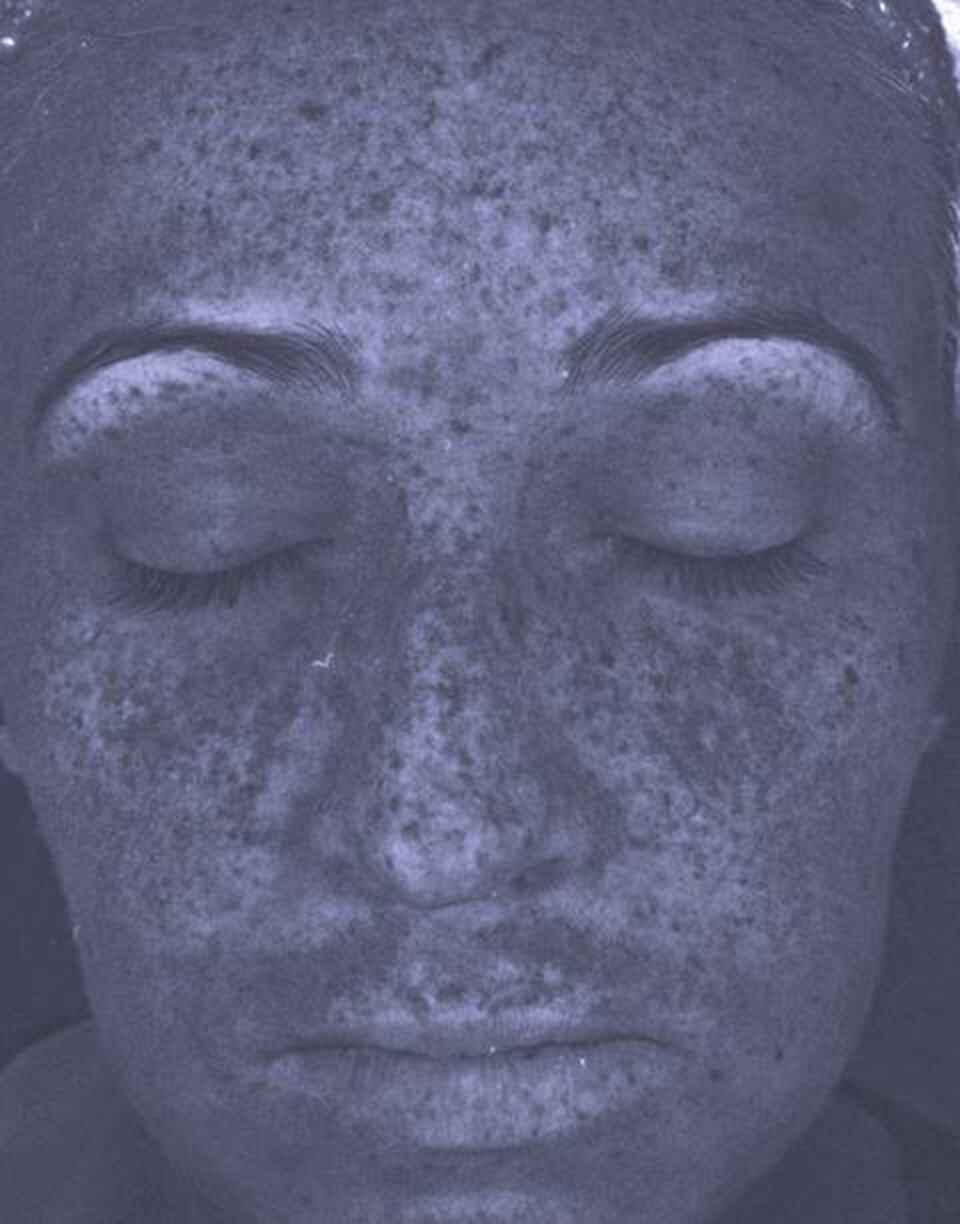
- Analyze the skin visually utilizing available tools such as: Visia®, Skin Scanner, Wood’s Lamp, or a 5-diopter magnification lamp. Note skin type and conditions on the Patient Profile form.
- Face Diagram – used to document specific areas of concern or areas the clinician has addressed. It is best to take before and after photographs. The Face Diagram can be used in addition to photos or in place of them if photographic equipment is not available to the clinician.
- Take “before” photos using either a camera or available imaging technology. If using a camera, a tripod and chin rest are useful to ensure consistent facial positioning at each appointment. These photos serve to remind the patient of their skin’s condition prior to treatments; as a way to track treatment progress; and, with their written consent, to build a portfolio of visible treatment results for your practice.
- Select the appropriate condition specific solution or customized regimen for the patient and educate them on the chosen product regimen.
- If planning to use hydroquinone, patch test a small area at this time in front of or behind the ear to verify they have no allergy or hypersensitivity to this ingredient.
- Apply the advanced treatment products from the correct category that are included in the trial-size solution you have selected for them. This allows the patient to experience your recommended products.
- Complete the analysis with the application of the appropriate SPF product for their skin type and condition; either Active Protection Body Broad Spectrum SPF 30, Weightless Protection Broad Spectrum SPF 45, Daily Defense Broad Spectrum SPF 50+, Hydrator Plus Broad Spectrum SPF 30, Active Broad Spectrum SPF 45, or Sheer Tint Broad Spectrum SPF 45.
- Review their recommended daily care regimen using either the Rx Treatment Plan or one of the PCA SKIN® condition-specific regimens.
How to analyze the skin
How to analyze the skin using UV light devices
Ultraviolet light is a very useful tool for accurate skin analysis. The violet rays of the lamp enable you to “see” into the deeper layers of the skin in order to help identify certain skin conditions and recommend a proper treatment protocol. Different conditions are determined by the various colors as shown through the magnification glass of the Wood’s Lamp, by looking into a machine such as Visia® or a Skin Scanner, or reviewing captured digital UV images. Some technologies have different settings for viewing various skin issues. If using a Wood’s Lamp, it must be used in a completely dark room. Consistent low light is best for most other technologies.
To assist you with reading the colors seen in the skin through a UV light device, please refer to the guide below:
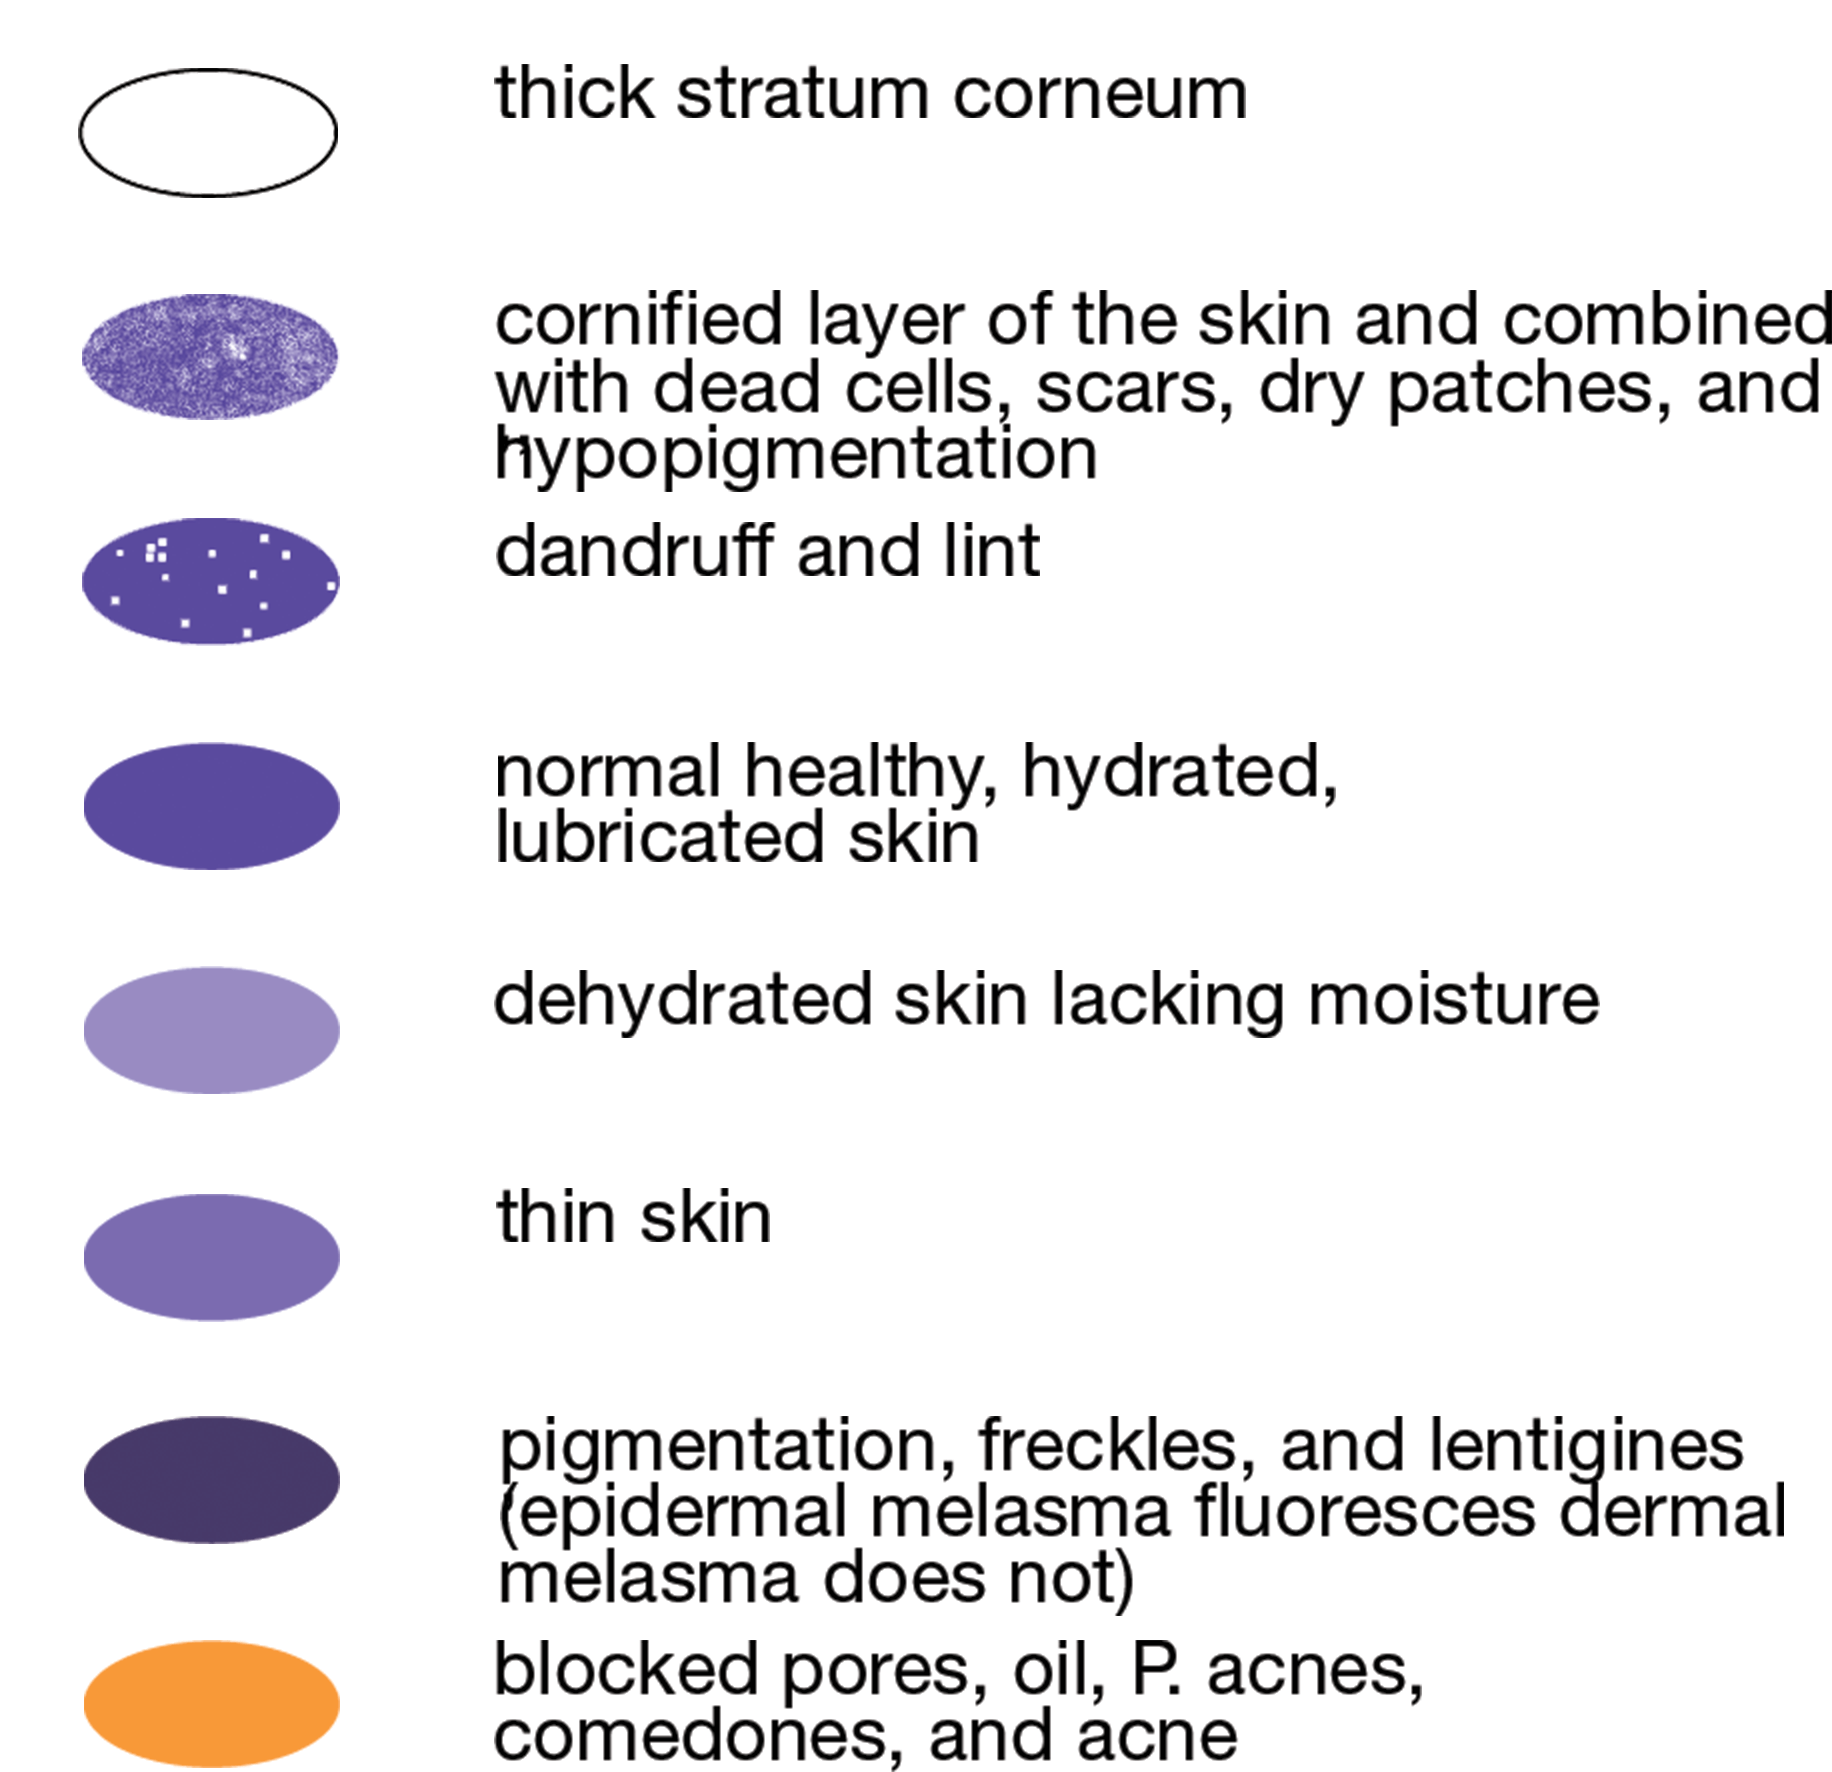
In general, the lighter/whiter the color, the thicker the skin is. For example, you will see a lighter color in the cheeks.
Thinner skin, such as the eyelids appear darker. Appropriate lubrication and hydration appears in purple tones. Dehydrated skin appears lighter and brighter in color, and less purple compared to hydrated skin.
The standard Wood’s Lamp is available through PCA SKIN®: 60 hertz,.17 amps, 115 volts, two 4 watt bulbs.
Before and After Photo Tips
Visual records of a patient’s history have many benefits. “Before” pictures help patients remember how far they have come in their course of treatment and they can greatly increase patient compliance. Also, with a patient’s written consent, before and after photographs may be used as a great way to market your practice and the services you offer. In order for photographs to be useful to you in your practice, they must be taken according to some basic guidelines.
- Use a high mega pixel camera or one of the many excellent imaging technologies available like Visia® or a Skin Scanner.
- Have your camera set up in a consistent location with a tripod, chin rest, and markings on the floor where a patient should sit/stand. This ensures that each set of photos is taken from the same distance and angle. Many imaging technologies provide this consistent environment as part of the device.
- Document the settings of your lighting. Using brighter lights in an “after” picture can lead people to believe that the picture was intentionally highlighted to make the results seem more dramatic. In face-forward photos, the intensity of the lighting can be easily detected in the patient’s pupils.
- At each visit take face-forward, left-side, and right-side photos.
- Remove all makeup to match the first photo. Dramatic lipstick or eye makeup can detract from the results you are attempting to document.
- Have patients remove all jewelry prior to taking any photographs.
Building a portfolio of the dramatic patient outcomes you can achieve using PCA SKIN® daily care and professional treatments is an excellent way to build your practice and increase your credibility.
Ensuring Patient Compliance
- Send your patients home with their daily care products and the Rx Treatment Plan. Give them instructions for product use and a Preparation for a Peel Treatment form.
- Determine the length of time between treatments according to each patient’s skin type and condition, ethnicity, and actinic damage (refer to Frequency of Treatment chart). Educate the patient on the importance of treating at the specified intervals to achieve the best possible outcome. Suggest a minimum of three treatments to start.
- Schedule the first peel treatment approximately two weeks after the initial consultation. This allows the patient to prep their skin with the PCA SKIN® daily care regimen you have recommended.
- Call your patient three to five days following the consultation to ensure the patient is responding well to the daily care regimen and to answer any questions.
Patient Peel Expectations
Patient expectations for superficial chemical peel treatments can occasionally be unrealistic. Although patients sign a consent form that clearly states that several treatments may be necessary to achieve the results they desire, they may forget this detail after their treatment. Even a well-written consent form does not guarantee accurate patient expectations. The fault of the unrealistic expectation is ours if we do not properly educate the patient as to anticipated results. When patients hear the word “peel” they expect to see visible exfoliation post-treatment. PCA SKIN® peels deliver excellent visible results whether or not actual visible peeling occurs. Frequently, exfoliation is at a cellular level and not apparent to the naked eye; however, the peels will create a tighter and firmer complexion and appearance.
PCA SKIN® professional treatments are formulated to preserve, promote, and protect healthy skin, regardless of whether the patient sees visible exfoliation following treatment. In today’s busy society, this progressive, rather than aggressive, approach is advantageous, as patients will experience minimal downtime yet still have outstanding results.
The carefully selected blends of liquid peeling ingredients work to break down surface buildup and loosen the desmosome bonds holding the keratinocytes together. Our liquid blended solutions incorporate additional targeted ingredients that nourish, strengthen, and protect the skin. Regular superficial peels also enhance the penetration and efficacy of the daily care products the patient uses at home.
Retinoid peels are effective for a variety of skin types and conditions. They are typically applied as creams and create little to no stimulation during treatment and create sometimes copious amounts of visible exfoliation in the days and weeks post-treatment. These responses are unique to each patient, but the outcome is reduced fine lines, smooth texture, reduced pigmentation, and an improvement in acne conditions.
When using PCA SKIN® chemical peel solutions, we highly recommend the skin be pre-treated with a PCA SKIN® daily care regimen prior to commencing in-office peel treatments to ensure optimum results and fewer chances of complications. This is not a requirement, but our results are based on the use of both daily care and peels.
Initial In-office Procedure
At this initial appointment, review the Patient Profile with your patient to be certain that nothing has changed in the two weeks since the consultation. Give the patient the opportunity to review their signed consent form, and have them initial and date
it to re-consent for that treatment. Review their expectations and desired outcome. Educate the patient about superficial peels, how they work on the skin, possible reactions, and what the professional treatments can realistically accomplish for their condition. Inform the patient that dryness, flaking, and a possible breakout would be considered normal, yet temporary reactions to a superficial chemical peel. Everyone’s skin is different, so it is important not to guarantee specific results.
Peel treatments are not to be performed on pregnant or lactating women, or patients who use tanning booths.
- Administer the selected procedure with a customized peel treatment that you determined to be appropriate for the skin type and condition of that particular patient.
- Watch for unusual reactions, such as excessive erythema (redness), edema (swelling), or blanching (protein coagulation).
- During and throughout the procedure, be sure to have the patient tell you how the procedure feels to them using the scale of one to ten.
- Always end your treatments with an application of the appropriate broad spectrum SPF product: Active Protection Body Broad Spectrum SPF 30, Weightless Protection Broad Spectrum SPF 45, Daily Defense Broad Spectrum SPF 50+, Hydrator Plus Broad Spectrum SPF 30, Active Broad Spectrum SPF 45, or Sheer Tint Broad Spectrum SPF 45.
- Document all data on the Patient Treatment Log, including number of peel layers, visible reactions, or comments made by the patient. Chart the highest number on the scale of one to ten reached by the patient at any time during the treatment for future reference.
- Recommend the patient use The Post-Procedure Solution for three to five days or seven days when receiving MD Peel (CCl3) following the treatment. It is recommended to include the cost of this solution with the price of the procedure to ensure the skin remains calm and hydrated following treatment.
- Let the patient know that if The Post-Procedure Solution is used as recommended until flaking has resolved, typically three to five days, they will be able to use it after their next professional treatment.
- Book the patient’s next appointment, and let the patient know you are available if they have any questions or concerns following the treatment.
- Call the patient the following day and document any comments or feedback.